 Landing on the front wheel
This is really a sophisticated move. The body weight shifting is a bit like in the roll-over climbing technique, jumping in full extension on the good pedal, and then throwing the shoulders forward and pulling the bike with you. But on top of that, you must push on the handlebars to force the landing on the front wheel as soon as possible, and carry on rolling on the front wheel until the rear wheel has cleared the gap and has some grip on the obstacle.
Commit to lurch
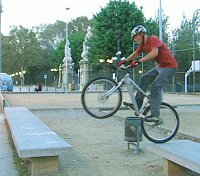
1° Start like for a basic pedal hop, in balance on the rear.
2° Lower the front wheel, start kicking in the good pedal.
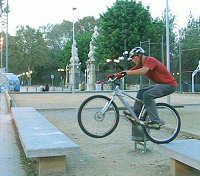
3° At the end of the pedal kick, throw your body forward.
4° Once in the air, shoulders above the bars, pull the bike with you by lifting the handlebars while
extending the arms in front of you. Start aiming the front wheel at where you want to land.
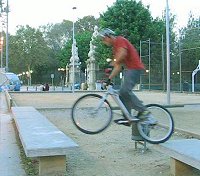
5° Above the landing area, push the front wheel downwards. When landing the front wheel, use the brakes to slow
the bike, but with inertia, keep your body moving by folding the knees.
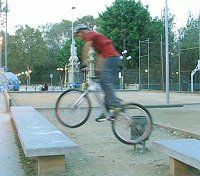
6° By shifting your centre of gravity above the bars, move away from the gap. Then release progressively
the front brake and extend the arms to roll forward and finish off the gap.
See this move in a video and practise over a virtual or shallow gap
How to practice?
Really, you should start practicing on a flat surface, with two lines as a virtual gap,
or climbing up on a very small kerb.
That way, you can learn how to throw your body forward and land directly on the front, without risking a bad crash on
your face (that is if you miss the edge). Then try to release the front brake progressively to let roll the bike on the
front, while the rear wheel is in the air. Vary the pressure in the brakes until you get this right. Only when the rear
wheel has reached the edge of the obstacle, you can shift your weight back above the rear wheel. That will stop
you rolling and stabilise the rear tyre onto the obstacle.
In effect, the bike is used like a tilting bridge. It is just smoother than the typical rear pedal hop, with more control and fluidity (no blunt with the rear tyre). If you land on a small area, and there is only room for one wheel, you can land and stay in balance on the front wheel, then release the brakes and hop to land on the rear wheel in a quick wheel-swap move, or turn on the front wheel while rolling, to position the rear tyre on a nearby edge. At the beginning, it's easier to learn the move by climbing small kerbs on your wrong side (on the same side of your driving foot). You could also use a variation of this technique to just climb up big steps with a smooth finish.
 All the clips in one video
(or right-click to download the .wmv file)
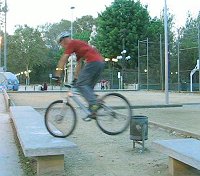
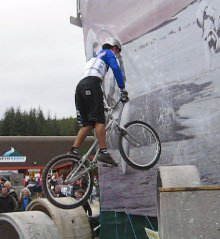
When landing is safer
on the front than on the rear

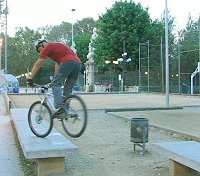
Precision stop on the front wheel
before a wheel swap to back wheel
Tips for a better flick
This move is easier with a slight angle (say about 20°) from the straight line, with your driving pedal
(good foot) on the side of the gap.
Also tilt the bike vertically on the side you will kick, this will make it easier to flick the bike to front
wheel around your driving leg when you are in full extension in the air (because when you kick, your body
weight is mainly distributed over your driving foot,
it will be easier to turn the bike around that foot along the leg axis. These little subtleties will allow you
to kick to full power while allowing the bike movement to compensate naturally for the asymmetric load.
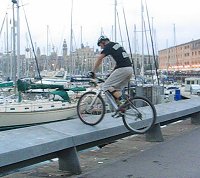
At a Pro level: pushing the move further
Landing on the front wheel is another approach
to big gaps. It makes the gap look smaller, and as you have some early front-wheel support on the obstacle
it does not require as much pedal power as trying to land on the rear wheel. The overall move is really smooth, but
missing the front-touch by only a few centimeters can result in a fully fledged face-plant onto the missed edge.
So you really need a lot of confidence to cross these big gaps and land onto limited space.
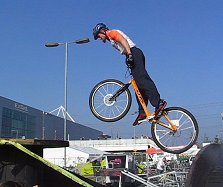
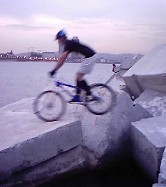
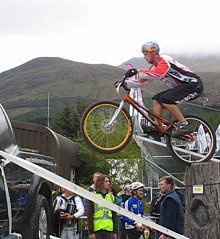
Full extension over the gap (Andrei).
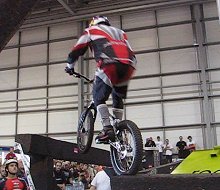
Ben Savage in a high up transition
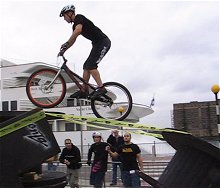
Precision gap to a pole by Kenny.
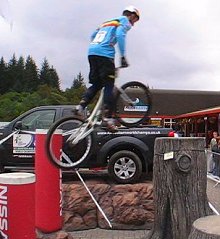
Gap to front wheel with a turn.

Looking for any trials specific components?
Check out the Manufacturers' listing on the Bikes page.
You'll find all the major MTB and biketrial names and online shops:
(Ashton, Czar, Echo, Gu, Inpulse, Koxx, Monty, Onza,
Ozonys, Rockman, Try-All, TMS, Viz, Zoo, etc...)
Sign the guestbook or email your comments
Copyright © 1998-2013: TrashZen


